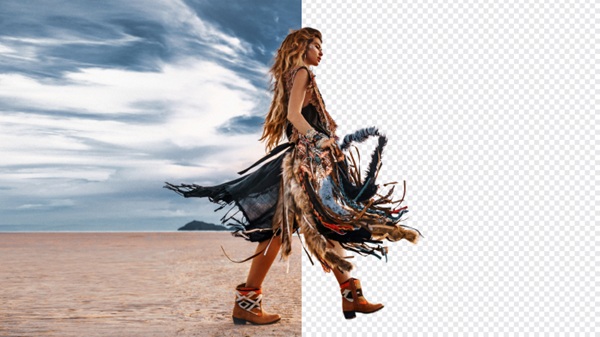
Using Precision: How to Get Perfect Green Screen Results?
You know it’s not always a popcorn-and- movie-night affair if you have ever tried editing someone out of a green background. You are often juggling those annoying shadows, untangling fuzzy edges, and battling flyaway hairs. Getting a perfect cut-out—especially one good enough for a client or a critical eye—means more than just running your preferred tool under “Remove Background”. Working in Photoshop, Premiere Pro, DaVinci Resolve, or just testing one of the top ai background remover tools, you’ll want every edge pristine as a winter morning.
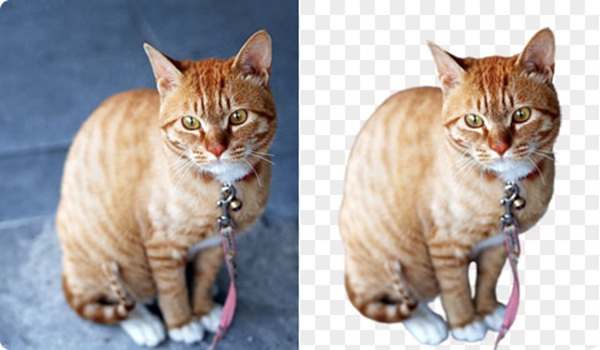
Green screen editing calls both attention to detail and imagination. Indeed, software has become smarter, but technology cannot handle all the tough work. The secret ingredient is Knowing what makes green screen function will enable the tech to assist rather than to impede you.
Getting That Clean Key: Base Before Finesse
Chroma keying, sometimes referred to as the magic of green screens, depends mostly on setup before you ever click. Let’s start with essentials; skipping these would be like building a house without first laying the concrete.
The secret is perfectly even illumination. One constant, flat color from corner to corner should be green. Shades or hotspots? Those will be your foes in the future. There should be several gentle lights. That green will kick back a great, even color if your subject is lighted like they are on a stage. Sometimes a little distance—say six feet—between your subject and the screen can also make all the difference between a blurry outline and precise edges.
Select clothes sensibly. Green shirt? Not even go there unless you wish the body of your topic to disappear. Jewelry or shiny objects can reflect green, leaving gaps in your picture later. Keep costumes far from the chroma color and props matte.
Dust the screen. A wrinkled or soiled screen is one of few things that mess with editing. Iron cloth backdrops, straighten lines, and fix any marks or dirt. The high-definition cameras available today are merciless.
Digital Diligence Pay Off: Fine-Tuning the Key
Good lighting and arrangement just go so far, though. The actual fun starts when you are at your computer. Though occasionally they need a gentle prod, AI programs like remove.bg, Canva’s background remover, and Unscreen save hours.

In settings, small details count. Watch tolerance sliders closely like an eagle. Too low you will leave green behind. Too high and farewell, pointed detailing. Overzealous keying can affect translucent items as well as hair. Rough cut initially, then a softer key on just the toughest places like hair or lace, many experts employ a two-pass technique.
Your pals are Feathering and edge smoothing. But be careful; a halo effect or loss of those minute details is more likely the more heavily you smooth. Always enlarge in and check at either 200% or 300%. Your sight might pass past problems of normal scale.
Work on the matte to get transparency. Certain programs let you somewhat lower the matte; only a pixel or two greatly affects edge quality. The secret is to bring the cut in close enough so stray green is gone, but not enough to amputate part of your subject.
Like a joker at a surprise party, color leakage can sneak up on you Edge colors approaching your subject often catch green from the screen. Many applications provide a spill suppressor tool; use it sparingly only in areas showing obvious color bleed.
On the periphery of your image, noise can seem like pixel confetti. Using a mask or a touch of blur helps to clean up noise so as to prevent a crunchy silhouette. But blur calls for a soft hand; else, you will return with that halo.
Typical Mistakes and Techniques to Prevent Them
There aren’t any short cuts on the path from green screen to gallery ready. Both beginners and experts fall into traps that could give even a top-notch project amateur impression.
Just one novice mistake? depending on one-click fixes without verifying results. Complex images—think unkempt hair, translucent veils, or motion blur—even the most advanced artificial intelligence removers find confusing. Tough calls call for hand adjustments.
Look out for the “Cardboard Cutout Effect”. This occurs when the backdrop is eliminated however the edges are not feathery. The man appears pulled out using garden shears—unnatural and startling. Crucially important are painstaking refinement and smoothness.
Using a poor-quality or poorly lit image is another mistake. Compression artifacts and imprecise resolution provide algorithms with poor starting point data. They cannot create details absent from reality.
Ignoring the background substitution can ruin your work. The mismatch is obvious if you drop your subject into a different area with blazing light when they were really photographed in soft shadow. Match between your cut-out and the new backdrop lighting, shadows, and color grading always.
Improving Realism Outside of the Cut
The cut represents only half the travel distance. Making it believable is where you shine. It is non-negotiable to match the color temperature of subject to background. Warm beach and a cool screen? That’s a short ticket to uncanny valley.
Make shadows if the fresh background begs for them. Even just under the feet, a small drop shadow or subdued blur helps ground your subject in the new world you have created for them. Overdoing shadows, however, may cause your subject to seem to be on a stage.
For little changes, use masking tools. Refining utilizing a layer mask allows significantly more control than depending merely on global modifications even after you have finished your first key.
Pursuing Perfection: Additional Tools and Strategies
Though they rarely get everything perfect, powerful artificial intelligence techniques speed up yesterday’s all-night editing processes. Still, manual work counts. For high-impact photos, one may thus use pen tools in Photoshop, edge brushes, or even drawing in stray hairs one at a time.
Use green spill suppression, but retain a light hand. Edge of your topic may seem weird or even pink from over-suppression. One useful tip is to sample realistic skin tones from within your picture and touch-up with a low-opacity brush.
Try background blur to correspond with the depth of vision of the original camera. Adding a razor-sharp substitute behind your subject if they were photographed with a soft, out-of-focus background looks terrible. A small Gaussian blur can really be quite effective.
