Learning Perfect Product Images for E-Commerce from Open Backgrounds
After removing backdrops, sellers and designers may find themselves battling jagged edges, strange color halos, and pixelation. Image quality post-background removal can seem like an uphill fight whether you are creating dynamic assets for a brand refresh or preparing a fresh batch of product images. Fortunately, the technology has advanced; anyone may access game-changing possibilities like the best ai background remover tool to expedite processes and clean those images for any design project or market.

The key sauce, though, is that you cannot simply click save, put it on a white canvas, and then think of your work done after eliminating the background. The next absolutely vital step is image enhancement. Particularly once the photos reach high-DPI screens or are blown up for hero banners, even the best automatic background removal programs often leave stray pixels or weak outlines that degrade otherwise sharp images. Correcting those tiny details distinguishes experts from others. Let’s start among the weeds and learn exactly what works, what doesn’t, and some brilliant tips the pros would not share over breakfast.
Cracking the Code of Background Elimination
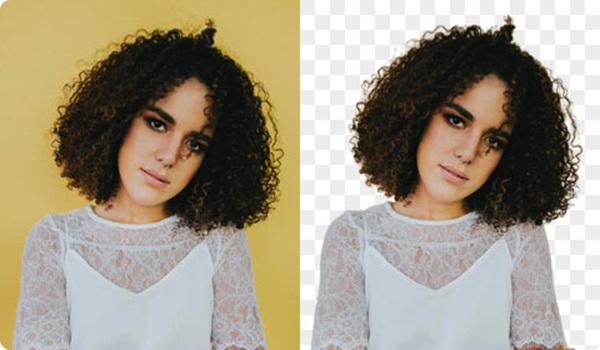
Automated backdrop removal tracks product contours using artificial intelligence. AI technologies like Photoshop or Gimp scan for the subject in seconds rather than conventional hand-drawn masks. Correct, clean? Nearly, though. Though clever as these devices are, they can have trouble with hair, translucent items, glassware, and fuzzy edges like sweater cuffs.
Improving the cutoff begins with the correct selection mode—often designated as “refined edge,” “smart subject selector,” or “hair detection.” The finest AI background removing application will provide choices for finetuning these cut locations, so allowing you to re-run the edge finder or change the mask opacity. Do not overlook these sliders. Just a few pixels will help to nudge the edge inward, therefore removing unpleasant halos.
Another important consideration is file format for savings. PNG-24 is the transparency gold standard. Unless file space is a major problem, never export to PNG-8; PNG-8 can cause severe banding and lose delicate fading gradients.
Maintaining Image Quality Following Background Removal
Nothing ruins a crisp listing more quickly than soft, artifact-filled edges. Steer clear of resaving the same file many times as a lossy JPEG if you want maximum clarity after removing the backdrop. Every saving chips away at clarity. For as long as your workflow allows, instead deal with lossless PNG or TIFF.
Your basis should be high-resolution photos. After removing its background, you should not expect miracles if your only access to a 600x 600 image. If absolutely necessary, use AI-driven programs; otherwise, always start with the largest version first. You approach magazine-quality, clean PNG exports one step closer for every 300-dpi master.

Before calling it a day, try zooming in to about 200–300%. Check the outline of your topic. Little smudges or feathery pixels may not show up at first view but, when the image runs against dark themes, colored backdrops, or even shadow effects on a busy website, they will become obvious problem areas.
On your background remover program, learn the feathering and smoothness controls. Feathering softly helps to soften sharp lines by blurring the change between the object and the translucent background. Unless your subject has an excessively hard edge, a small feather—0.5 to 1.5 pixels—is usually a better choice than a sharp, aggressive cutoff.
Managing Tricky Objects: Shadows, Glass, and Hair
Some cutouts will always be harder than others. Typical headaches include human models with wild curls, bottles, watches behind translucent display glass, or products shot with complicated shadows.
Regarding hair, always seek for a dedicated “hair mask” mode or a refining tool with “decontaminate colors”. This produces even wispy strands without giving your subject an odd halo. Carefully hand-painted or erased the mask to mirror the transparency of the original using glass or translucent substances. While this can be tiresome, everything worthwhile is worth doing well.
Your buddy are shadows; occasionally your enemies. Excellent artificial intelligence algorithms can separate product shadows into their own layer. Though hard cast shadows with clear outlines don’t play well on every background, keeping a soft, natural shadow frequently looks better than a cutout floating in space. Using layer effects in Photoshop or GIMP, you may choose to reduce their opacity or fade their edges for realism.
Perfecting Clear Backgrounds for Every Market
Every online store has their own taste of image needs. For photos with a pure white (#FFFFFF) or transparent backdrop, sized at least 1000 pixels on the smallest side, Amazon, for example, favors Etsy lets you create more flexible canvases, but clarity still rules.
Always line up several images on the same transparent or colored “canvas” background to achieve nail consistency. Drop a grid overlay over setup to ensure constant centering and size from shot to shot. Many great e-commerce companies swear by ” template” files in Photoshop or Canva, where shadows, proportions, even overlay designs are locked in place.
Optimizing File Sizes Without compromising Quality
Faster loading times result in plain, simple increased conversions. Big PNG-24 files can be cumbersome, especially for mobile buyers, nevertheless. Fortunately, compressing PNGs free of unpleasant JPEG artifacts is simpler than it has ever been.
Strip unnecessary bytes from your files with TinyPNG or ImageOptim. If your platform lets, think about using the transparent WEBP structure that Apple and Chrome now support generally. They provide a superb combination of low size and good quality with transparency maintained. First, just confirm compatibility with your marketplace; some still follow more antiquated browser standards.
After background removal, Pro Color Correction
Once your subject has been separated on a clear field, color marks the last mile in professionalism. Perfect studio lights are not always available. Off-white backgrounds might deceive the auto-white balance of your camera, and products may seem either overly vivid or drab.
On your isolated topic, run a levels or curve adjustment. This snaps shadows into proper equilibrium. Look for neon edges—overzealous cutter tools might leave faint color traces, particularly visible around brilliant or white objects against dark themes. Control any odd color fringing along edges with the desaturate tool.
Another important phase is sharpening; always use a light touch. Particularly for fabrics, shoes, or tech gear, the “Unsharp Mask” filter—set to a radius between 0.3 and 1.0 pixels and a quantity below 80%—can give your subject some pop.
