Lighting: The Invisible Support System to Replace Green Screens
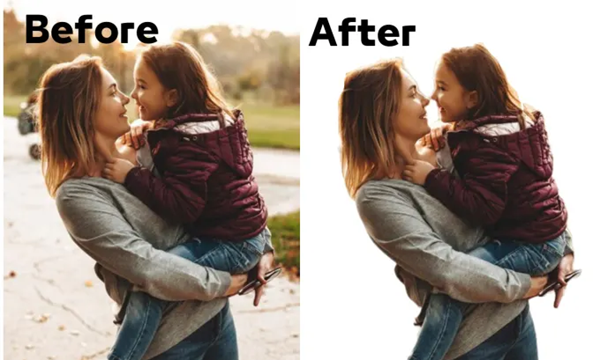
Imagine this: you just set up your green screen, your topic looks clean, and you are ready to start your next project into total creative mode. You are silently, somewhere in the rear of your mind, anxious about post-production headaches, especially the dreadful struggle to remove white background. Unbelievably, lighting becomes the golden ticket or gremlin deciding the degree of post-production ride smoothness.
Why Lighting Counts More Than You Would Think?
Lighting is the unsung hero—not only a technical tool but also a design element. Skimp on even illumination and you provide a jigsaw lacking half of its components for your compositing tool. Where light falls, you will be fighting challenging shadows, rogue color splash, and uneven green tones.
Although bad lighting may seem to be a minor issue on set, the consequences on keying are not minor. Usually seen as detail worth preserving, shadows turn into dark green patches the keyer perceives as Even the most seasoned VFX artist would shiver over the pixelated, hazy aftermaths this creates.
See your subject floating over a lovely pond. Your subject, the boat, will find it more natural to float the smoother and more reflective the water (your backdrop). asymmetrical lighting? That pond now seems jagged and untidy; you are practically pushing your subject to trip on their own reflection.
Standard Lighting Errors
Some people believe that a green screen may be lit with just a few lamps and sunlight. It doesn’t usually work. Natural light varies hourly, thereby influencing color constancy. Many bulbs free of diffusing action There will be hot spots—blazing dazzling specks surrounded by gloomy shadows.
Then there’s the traditional mistake of using the same force to light your subject and backdrop. Your actor’s hair or clothes gets covered with light bouncing off the green wall. That’s the “green fringe” allowing amateur compositing to be immediately seen.
Even and separate is the magic recipe.
The corrected strategy then is what? Using two rather than one lighting configuration. One for your subject, one for the backdrop. Green screens love a fair touch: evenly scatter big, soft lights on the backdrop. Your friends in this are softboxes. You want to brush away any ominous shadows or any blazing brilliant area on the green.
Also give your subject soft illumination; just enough to allow them stand out without casting shadows on the green surface. Although three-point lighting is excellent, keeping the background somewhat darker than your ability helps stop color leaking. Sometimes a hair light produces the razor-sharp cutout everyone dreams of by keeping your skill from melting into the green. As much as science, it is art.
The little variations between brightness and chrominance
Dealbreaker: Consistency of Colors
Here things start to heat up. Not every green generates exactly the same. Your keyer may lose performance even from one corner of your backdrop to the other—just the smallest movement in hue. You are left tearing your hair out frame by frame while the application cannot decide what to delete when one region of your green screen is more lime and another more forest.
First to keep peace on your palette, choose a premium, neutral green screen. Fabric or paint, it has to be constant in color. You want continuous chrominance—that is, color information.
Even with the perfect shade, you still find yourself in the same situation if light intensity (luminance) zigzag over the wall. The human eye lets little deviations go; but, computers? Like a young child seated at the dinner table, fussy.
The subtle agent of Saboteur is Green Spill.
Has DIY green screen shot-based clothing or skin ever shown a greenish tint? That’s a green spill—where light softly covers your subject with colors not acceptable for reflecting off a green surface. It’s the digital equivalent of bad foundation makeup. You will spend too much time in post painting out those soupy edges.
You can control spill by including a backlight or rim light for your subject. You keep their genuine colors apart from that vivid green wall by lighting them RIGHT, not LIKE the green. Every second preserved in post is a second more exploited for inspiration.
High Resolution: Unsung Member of the Clean Keys Team
Lighting sets the setting; resolution covers the details. If your footage is too low-resolution, you could have ideal lighting and nonetheless produce videos seeming piped out a colander. Resolution influences much more than just pixel count bragging rights.
If you are filming a simple standing interview against a green screen, consider the appropriate resolution for keying. Keyer has a lot of material to work with at 1080p: borders are clear, detail in hair and garments stays sharp, and you can tinker with the matte without everything collapsing into digital confetti.

If you drop to 720p or less, though, it’s like asking your computer to generate a sidewalk chalk image. Detail vanishes especially around the margins. Key green becomes a nightmare surrounding clear cloth or between hair strands. The same is true of compressed video; compression artifacts often come up as little blocks, damaging even the best-lit background.
That does not mean everyone has to raid their savings to film in 8K. Sometimes high resolution just gives you room to edit and trim in post without thinking about your final pixelating effect. Don’t go lower than 1080p; unless you like drama and disappointment when you try to remove white backdrop or pull a pro-level key.
Chroma sampling and bit depth: the hidden components
Resolution depends critically on bit depth—how much color information is stored—and chroma sampling—how much color data per pixel; it is not a vacuum. Though you record in 4K, an 8-bit color film taken with a 4:2:0 chroma subsampling loses a lot of information in gradients and edges.
Try for at least 4:2:2 subsampling and 10-bit color depth always within reach. Especially for fine edge detail, this gives your keyer the sophisticated data she needs. Thus, keep in mind additional color information suggests smoother, cleaner keys next time you fixate over camera settings or codec selection.
