Are you a student with a presentation coming along the way but stuck up on removing the background picture in PowerPoint? Welcome to our blog! Here, we will help you alleviate the difficulty you might be experiencing in removing the background image for your upcoming presentation.
To cut it short, you can either leverage the “remove the background tool” or the “transparent color” one — let’s walk you through it.
However, before that, keep in mind that these methods only work for the Desktop Version of PowerPoint.
Removing white background image in PowerPoint: Using Transparent Color Tool
Is your presentation image on a white background, and you’re hoping to remove it before your next PowerPoint presentation? Get familiar with the “Set Transparent Color tool.” Now, how do you use it?
- Firstly, upload the picture to PowerPoint and select it.
- Head to the Picture Formattab at the top.
- Select and click on the “Color dropdown.”
- Right at the bottom, look for the “Set Transparent Color” option and select that.
- Next, tap the background color of the picture you want to remove.
Having done that, your picture’s background should be gone, and you can continue with your presentation.
Removing background from image in PowerPoint: Using the background tool
This is the second method of removing a background from PowerPoint. However, the method works only for backgrounds with pictures that are complex to remove. An example is images having shadows, trees, or a beach in their background. Now how do you remove them?
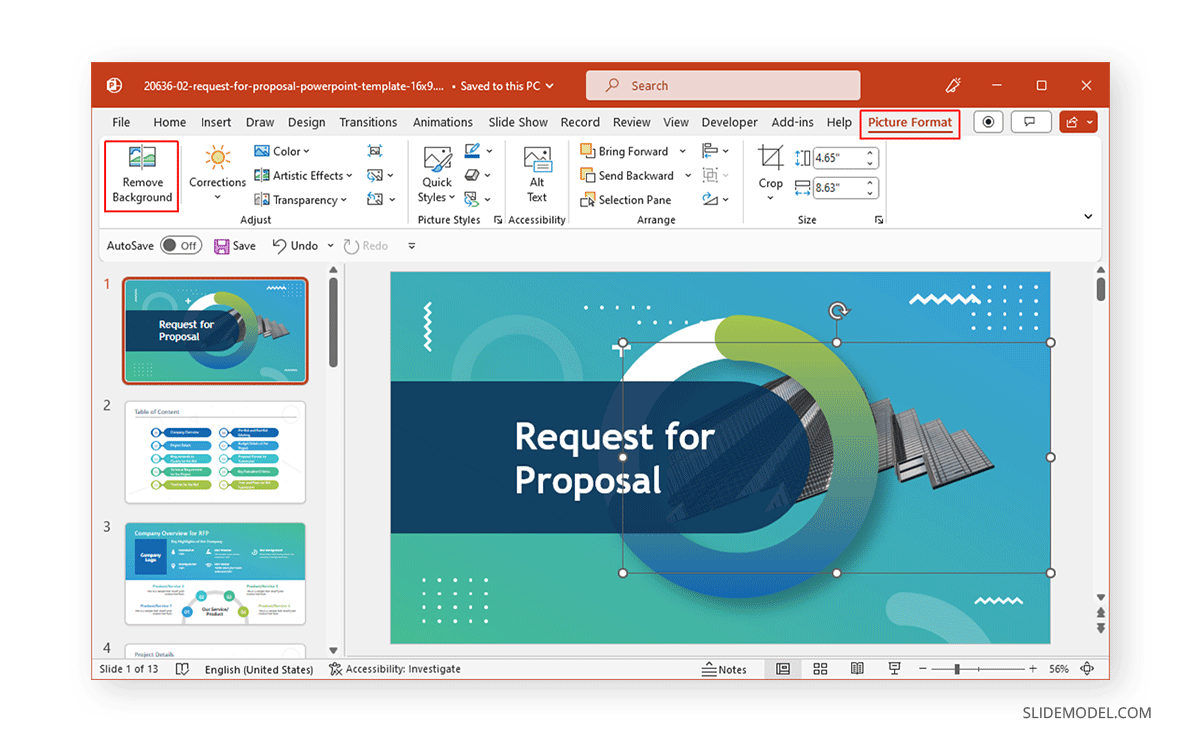
- Firstly, select your picture by clicking on it.
- Then, at the top bar, you will find the “Picture Format” then tap on it.
- Next, click the “Remove Background” which you will find at the upper left corner. (Doing that will promptPowerPoint to select/highlight the parts of the picture it identifies as the background).
- Shortly, you will see some areas marked in purple. That is the background to be removed. If by chance, the purple area extends to some parts you want to keep, you can adjust the parts you want to keep.
- Now, head to the left-hand corner of the menu and choose the “Mark Areas to Keep” With that, you can now choose the areas you’d like to ‘keep’. For example, hairs.
- Then you can choose the click and drag to select a wider area. Another way is to click or draw a line on the picture and PowerPoint will highlight them.
Once you’re satisfied, head on to punch the > Keep Changes.
In a jiffy, you will have your picture with the background removed.
If by chance, these steps are unable to remove all the background areas you would like to remove, head on and select “Mark Areas to Remove.” The option will allow you to fine-tune the edges.
Conclusion
To ensure a great workflow in your next PowerPoint presentation, removing backgrounds might just be the thing to integrate. Of course, you don’t want to have anything to disturb you while presenting hence we hope we have been able to give a way out to helping you ensure a smooth presentation. For related posts, stay tuned to our website and visit regularly.
